
















WRITE US YOUR QUERY
Hello friends, welcome to FroggyLeap, the best institute for Photoshop Training in Kolkata. Here we discuss about Adobe Photoshop, it's various Tools, Technique and Procedures in detail and in this lesson we will discuss about how to make a selection in Photoshop. We will discuss about 10 different ways of Selection Procedures, Tools and Techniques.
Photoshop is the best image post-processing software among millions of Photographers, Graphic Artists, Art Directors, Graphic & Web Designer in the world. There is nothing like Adobe Photoshop for image editing, restoration, colour correction and image processing. The immense beauty of this astonishing software lies in its tools and various options that it offers and the most best part is that with every new edition launched, Adobe comes up with new set of tools and techniques. That’s just awesome.
As A, B, C, D is the fundamental of English Language, "SELECTION" is the very basic of Photoshop. The tools that every Photoshop artist uses most are selection tools. Any task that we need to do in Photoshop, first need the selection.
Adobe Photoshop has wide range of selection procedures, tools and techniques. Here in this session, we will learn about couple of them. So friends, go through it or you can visit our website for Photoshop Course in Kolkata.
WHAT YOU WILL LEARN HERE 
We offer best Photoshop Home Tuition & Photoshop Training as your preferable place
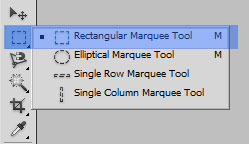
Marquee Tool is the first tool for selection in Tool Bar. The Marquee tool is the most basic selection tool in Photoshop. Letter “M” stands for Marquee tool. To use it, first press “M” (short key of marquee tool), then click and drag on the area you want to select. You can change over between rectangular (for rectangle / square), elliptical (for circle / oval), single line row and single column row marquee options by holding down the button and selecting your chosen marquee tool.
** Note: You can change over between Rectangular Marquee Tool and Elliptical Marquee Tool by pressing (Shift + M).
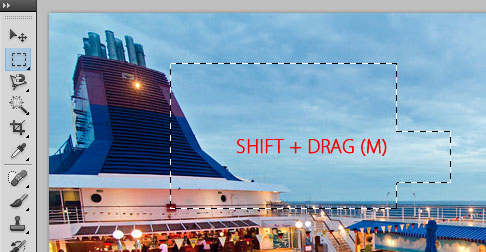
** Note: Selection Addition – First draw the selection, then Pressing "Shift" drag the selection. It will expand it. See the image:
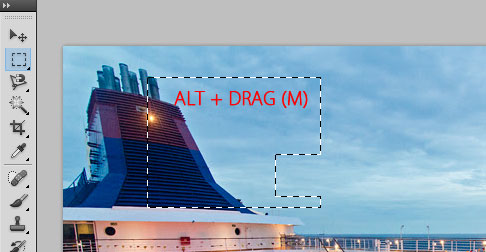
** Note: Selection Deletion – First draw the selection, then Pressing “Alt” drag the selection. It will trip it. See the image:
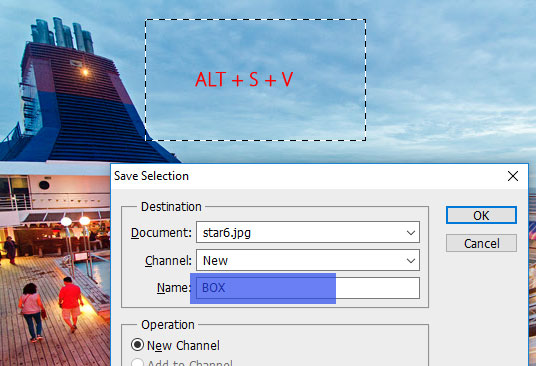
** Note: Save Selection – It is very important because some time we need same selection for different types of work in different time. If we save the selection / selected area / drawing area, it saves our time and effort. To save the selection, first select the area and then press (Alt + S + V). The selection dialogue box will open. Give a proper name and then click OK. See the image:
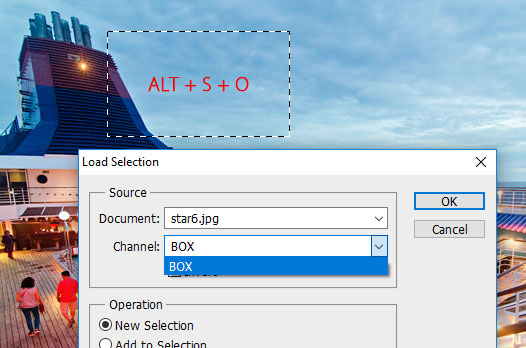
** Note: Load Selection – To use pre-saved selection, we need to load the selection from the saved data. To do this press (Alt + S + O). The selection dialogue box will open. From the drop down menu select the selection and press OK. See the image:

There are three type of Lasso in Photoshop A)Lasso Tool B)Polygonal Lasso Tool C)Magnetic Lasso Tool.
First we discussed about Marquee Tool which is very important but have some limitation. It is confined in rectangular, circular or line selection. You cant do more than that. Now what is the solution if we want to select as per our choice or as required. The first solution in Lasso Tool.
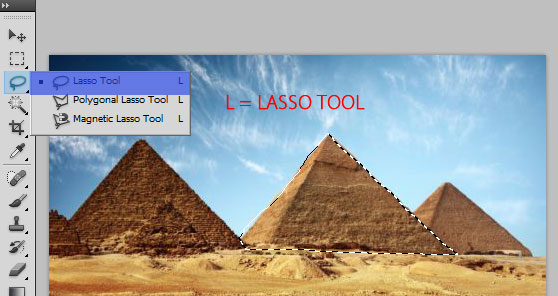
A) Lasso Tool : Lasso Tools is free flow and gives us ability to move around areas freely. To do this, click and drag the pointer around an area you want to select. See the image:
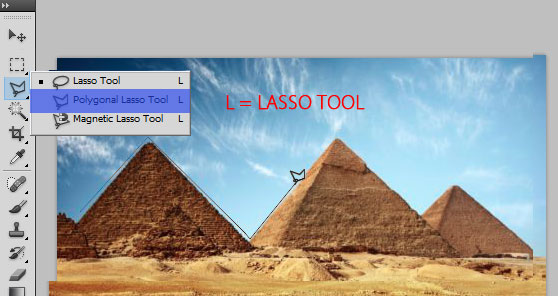
B) Polygonal Lasso Tool : This tool also helps us to make wide range of selection. It is similar to the Pen Tool except nodes that gives extra flexibility to Pen Tool to draw and selection. The selection with Polygonal Lasso Tool is restricted to straight polygonal outlines. It is easier to use because it allows you to select freely based on the points.
C) Magnetic Lasso Tool : Magnetic Lasso is also very useful and important tool for selection. As name suggest, it works like magnet and automatically select the area as you roll over the mouse. Select the tool, click on the first point and move the pointer along the path or outline you wish to draw. Finish the selection by going back to the same position you started. That’s it.

The short cut of Quick Selection Tool is W. This is one of the best tool to select a particular area very quickly. The quick selection tool selects areas based on color and tone. To use it, first select the tool, then click on an area of the image you want to include in the selection and Photoshop will automatically make the selection for you based on color, tone and movement of your mouse. You can also include or remove certain areas using the add to selection (Shift = +) and subtract a selection (Alt = -) options in the tool options. Making selection with Quick Selection Tool is really fun.
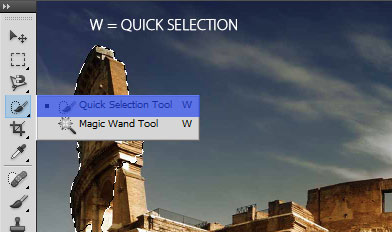

The short cut for Magic Wand Tool is also W. You can swap between Quick Selection Tool & Magic Wand Tool with (Shift + W). This is also very important tool for selection. It is used to select an area based on a specific color and makes selection faster when dealing with sharp edges that are normally difficult to reach and takes time to select using the freehand tools. To use this tool, simply click on the color of desired area you want to select. You have to adjust the Tolerance for selection depth. It is very easy & usefull tool to use.
Color Range is also one of the most important selection tool in Photoshop. You can find Color Range under Selection Sub-Menu. See the Pic.
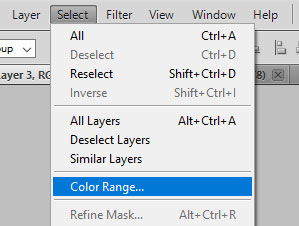
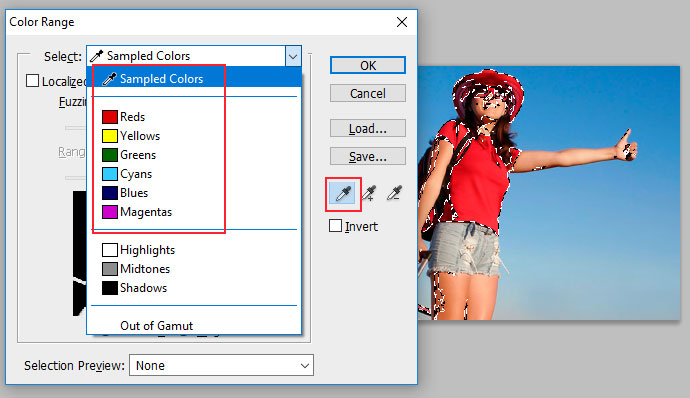
Color range works similarly like magic wand tool, but the selection includes all the areas based a specific scope of colors that we choose from within the image. We can also Add or Substract the selection area using (+) and (-) eyedroping tool. There are also options for others multiple color selection like Red, Yellow, Green, Cyne, Blues, Magenta etc.
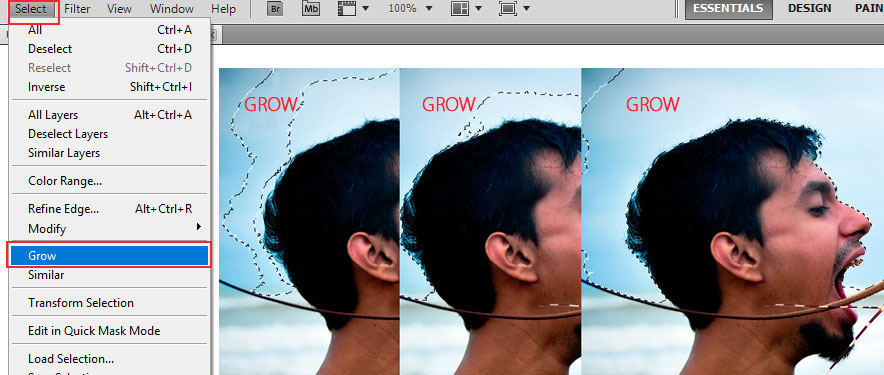
This selection option is also another great menu under Select sub-menu. This menu extends the selected area based on current selection, color and tone. To use this tool, first select some area you want to select, then again go to (Select – Grow) and repeat the process untill you get desired selection area. This tool is very easy to use. See the pic below.
This tool also can be found under Select sub-menu. This tool works with pre-existing selection and extend the selection based on specific color and tonal range for any image.
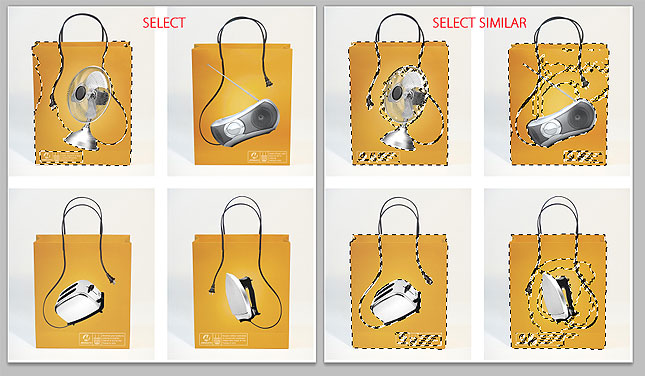
In the above image, first we make a selection on the left image, then we choose similar under selection menu. What is oes is, it select all areas within the image with same color and tonal range. It is not necessery that that the selection will be from these 4 yellowish background. It may be from another section of the image with same tonal range. The proces can be repeted untill desired resul achieved.

We can find Inverse selection under Select Sub-menu. Inverse is used to select the exact opposite area with any pre existing selection.
This process (Shift + Ctrm + I) automatically selects the area that isn’t selected initially and deselects the pre selection. If it is found that selecting an area seems more difficult where it has a flat background colour, it is better to select the flat background first, then do the opposite selection with Inverse. See the picture below :

In the above example, we want to select the area other than character in the picture i.e. the white area. What we did, first we select the character with Quick Selection Tool (w) and then do the Inverse selection (Shft + Ctrl + I) and fill the area with blue. It is very useful tool and often we use it in our job.
When you need to be very particular or precise about the edges of a selection, you can use Refine Edge tool. A skilled hand in Photoshop can create a precision selection with images. This is very important tool and highly used by Graphic Designers in Kolkata.
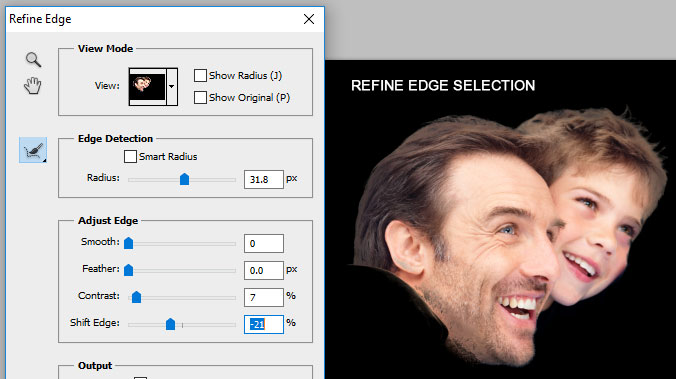
These three options also can be found under Select sub-menu. Every time while dealing with selection, we need this.
All - selects all the areas in the document irrespective of layers. i.e. it done not take in to count when we do select all. Short form of this is (Ctrl + A)
Deselect - remove the selection from the work area. The short form deselect id (Ctrl + D)
Reselect - is also very important. Using Reselect bring back the exact selection area which we deselect. It is often required to load the pre deselect area again in the middle of any job and at that time (Shif + Ctrl + D) solve the problem.
So friends, hope I have given a clear view about selection in Photoshop. It is very basic thing but has lots of importance because without selection nothing can be done in Photoshop. Every graphic designer or Photoshop Artist must be well conversant in these techniques.
Here at FroggyLeap we provide Photoshop Home Tuition in Kolkata to Students, Photographers, Artists, Art Directors, Web Designers, Graphic Designers and freelancers from the very basic to advance level. Join the Photoshop Course in Kolkata and be a Photoshop Professionals with 100% confidence.
Contact :
FroggyLeap
Ichapur, Surya Nagar
PO Nawabgabj
DST 24PGS (N)
Kolkata-743144
West Bengal
India
For any query: +91-9830889567
Weblink: https://www.froggyleap.com/photoshop-training-course-kolkata-india.html
Want to become an expert in Photoshop & Graphic Designing? Join us today!
Our Photoshop Course is divided in 3 categories 1) Photoshop Basic 2) Photoshop Advanced 3) Photoshop Crash Course + Corel Draw (12 Hrs)


This Photoshop Training in Kolkata covers mostly used tools & techniques. This Photoshop Training is best for career aspirants in Graphic Designing, Print & Web Media


This Advanced Photoshop Training in Kolkata covers all tools & techniques. This Photoshop Course is best for career aspirants in Graphic Designing, Photography & Digital Marketing


This crash course quickly covers Trainings on Adobe Photoshop Tools & Techniques along with 12 hours of in-depth CorelDraw Training in Kolkata, India.
SEO, PPC, HTML, CSS, PHOTOSHOP, CORELDRAW
Digital Marketing, Web Designing & Graphic Designing Training Institute
Kolkata, West Bengal, India
Phone +91-9830889567
Email log.froggyleap@gmail.com

|
FroggyLeap Reviews
4.9 Stars Rating, out of 5 based on 15 Reviews |